|
These are hands down one of my favorite foods. Anyone else?! There is something about them that screams comfort because they remind me of my childhood, ordering in Chinese food just about every Friday night with my best friends.
Since becoming #glutenfree in 2011 I STRUGGLED to find the perfect bowl of cold sesame peanut noodles. While there is one spot in New York that has truly mastered gluten free Chinese food it’s not exactly around the corner. So, after LOTS of research and recipes testing I present to you the perfect cold sesame peanut noodle recipe 🤗🤍✨ P.S. These pair PERFECTLY with my Chopped Thai Salad Cold Sesame Peanut Noodles 💛 {gf, df & v} Yield 3-4 servings Ingredients ✔️1/2 lb asian rice noodles (I use brown rice for added #fiber ) ✔️1/3 cup water ✔️3 tablespoons creamy peanut butter ✔️2 tablespoons tamari or low sodium soy sauce ✔️2 tablespoons rice vinegar ✔️1 tablespoon brown sugar ✔️2 tablespoons roasted peanut oil (don’t swap this ingredient!) ✔️2 teaspoons sesame seeds ✔️1/2-1 teaspoon chili garlic sauce (this adds flavor and heat 🔥, use 1 teaspoon for a spicy and 1/2 teaspoon for mild) ✔️1/4 teaspoon sesame oil ✔️1/4” piece of ginger, peeled ✔️1 small clove of garlic ✔️fresh scallions for topping, sliced Directions 1. In a large pot bring water to a boil and cool the noodles according to the instructions on the package. Once drained, rinse with cold water and transfer to a large bowl. 2. In a blender combine water, peanut butter, tamari/soy sauce, rice vinegar, brown sugar, peanut oil, sesame seeds, chili garlic sauce, sesame oil, ginger and garlic. Blend until smooth. 3. Pour the sauce over the noodles and mix well. **It will look like there is a lot of extra sauce, there isn’t, just trust the process** 4. Cover the bowl and put in the refrigerator for at least an hour but I ideally 3-4 hours, the longer the better! 5. Before serving toss the noodles, top with scallions and more sesame seeds, then ENJOY!! Recipe inspired by @tablefortwo
0 Comments
If you’ve been following me for some time you know that I take my Mexican food very seriously. I have a great affinity for Mexican food so if I’m going to make it, I’ve got to do it right.
One dish I always wanted to make were homemade enchiladas! Now, I don’t buy my taco seasoning so there isn’t a chance I was going to buy my enchilada sauce. After some research I came to realize 2 things… I don’t have dried chiles or Mexican chocolate on hand. Both of which are essential for a traditional Mexican enchilada sauce. Luckily I found a recipe that uses pantry staple spices I do have on hand, and WOW it’s tasty 😋 Since discovering this recipe I’ve made it numerous times because my family loves it so much! The sauce is also great on tacos, drizzled on nachos and as a dip for chips. I hope you enjoy this recipe as much as me and my family do! Happy cooking 🤗🤍✨ Enchilada Sauce 🧡 {GF, DF & V} Ingredients ✔️2 tablespoons olive oil ✔️2 tablespoons all-purpose flour (regular or GF) ✔️4 tablespoons chili powder ✔️1 teaspoon onion powder ✔️1/2 teaspoon garlic powder ✔️1/2 teaspoon salt ✔️1/4 teaspoon ground cumin ✔️1/4 teaspoon dried oregano ✔️2 1/4 cups broth (chicken or vegetable) ✔️2 tablespoons tomato paste 1. In a small pot, heat olive oil over medium-high heat. 2. Add flour and whisk together for 1 minute. 3. Add chili powder, onion powder, garlic powder, salt, cumin and dried oregano and whisk together for 30 seconds. 4. Slowly pour in the broth while whisking constantly to make sure no big lumps form. 5. Add the tomato paste and whisk the enchilada sauce until completely smooth. 6. Bring to a simmer, remove from heat and serve. Recipe by @isabeleats This is the recipe that started my love affair with tofu. Since making it for the first time I’ve made it NUMEROUS times and each time it’s just as good. The sauce comes together in 2 minutes and this whole meal can be made in under 20 minutes. Throw in the odds and ends of veggies in your refrigerator, serve it with some rice and BOOM! Dinner is served 🤗🤍✨
Sweet Chili Tofu {GF & DF} Ingredients Sauce ✔️1/4 Cup Water ✔️ 3 TBSP Rice Vinegar ✔️ 2 TBSP Sugar (I use brown or coconut sugar) ✔️ 2 TBSP Tomato Paste ✔️ 1 TBSP Sambal Oleke Chili Paste ✔️ 1/2 tbsp coconut aminos ✔️ 2 Cloves Garlic, Minced ✔️ 1/4 TSP Salt ✔️ 1/4 TSP Arrowroot or Cornstarch Protein ✔️ 10–14 oz of extra firm tofu, cubed (or another protein of your choice) ✔️ 1 TBSP Soy Sauce/Tamara/Coconut Aminos ✔️ 2 TBSP Arrowroot ✔️ 1/4 TSP Garlic Powder ✔️ Salt & Pepper to taste ✔️ Avocado Oil Veggies ✔️ 3 Cups Chopped Veggies Directions 1. Make the sauce by whisking all ingredients together and set aside. 2. Toss your protein with the starch, soy sauce, garlic powder, and salt and pepper in a large bowl until well-coated. 3. Heat a large pan over medium heat with the avocado oil. Once hot, add protein and cook for 6-8 minutes, stirring occasionally. Once slightly browned remove from pan and set aside. 4. Add a splash of oil to the hot pan and stir in your veggies. Season with salt and pepper and cook for 5-6 minutes, until softened. 5. Pour your sauce over the veggies and reduce the heat. Allow to thicken for about 1 minute, stirring occasionally, then add your protein back in. Allow to simmer for 5 minutes. Serve & ENJOY!! Recipe by Gathered Nutrition MEXICAN STREET CORN FRITTERS 🧡 If you’re looking kick your next Taco Tuesday up a couple notches and give it a summary twist this is the perfect side!
These Mexican Street Corn Fritters pair perfectly with traditional carne asada tacos. Serve it with my lazy girl guac and end the night with some fresh watermelon! 🍉 Is your mouth already watering too?!🤗🤍✨ MEXICAN STREET CORN FRITTERS {GF} Ingredients Fritters ✔️2½ cups corn off the cob (use frozen or about 4 ears fresh corn) ✔️1/3 cup fine cornmeal ✔️1/3 cup all purpose flour (regular or gf) ✔️½ tsp baking powder ✔️1 tsp chili powder ✔️½ tsp garlic powder ✔️½ tsp salt ✔️1 egg, beaten ✔️½ cup milk ✔️¼ cup scallions, sliced ✔️3 tsp lime juice, divided ✔️1 cup crumbled cotija cheese ✔️EVOO Cilantro Lime Yogurt ✔️½ cup plain greek yogurt ✔️2 tsp lime juice ✔️2 Tbsp chopped cilantro ✔️sliced chives or scallions** Directions If using fresh corn start at step 1, if you’re using frozen corn start by defrosting your corn in the microwave and begin at step 2. 1. Heat your grill or a grill pan over medium high heat. Coat the ears of corn with EVOO and grill the corn, turning occasionally, until cooked and charred in some places. This should take about 8-10 minutes. Remove from grill and let cool. Cut the kernels from the cobs (you should have ~2½ cups). Place the corn in a bowl and set aside. 2. Whisk the cornmeal, flour, baking powder, chili powder, garlic powder, and salt together in a large bowl. Add the beaten egg and milk and stir to combine. Stir in the chives, 2 cups of corn, 2 teaspoons lime juice and ¾ cup cotija cheese. 3. Mix the remaining ½ cup corn, ¼ cup cotija, 1 teaspoon lime juice, and a pinch of salt together in a small bowl. This will be your topping, set aside. 4. Now make the cilantro lime yogurt. Stir the yogurt, lime juice and cilantro together in a small bowl and set aside. Recipe by @thefoodiephysician and continued in the comments 🤗🤍✨ BESTO PESTO 🌿 I don’t know about anyone else but there is something about spring and pesto that just feels right 🌷🌿🤍✨
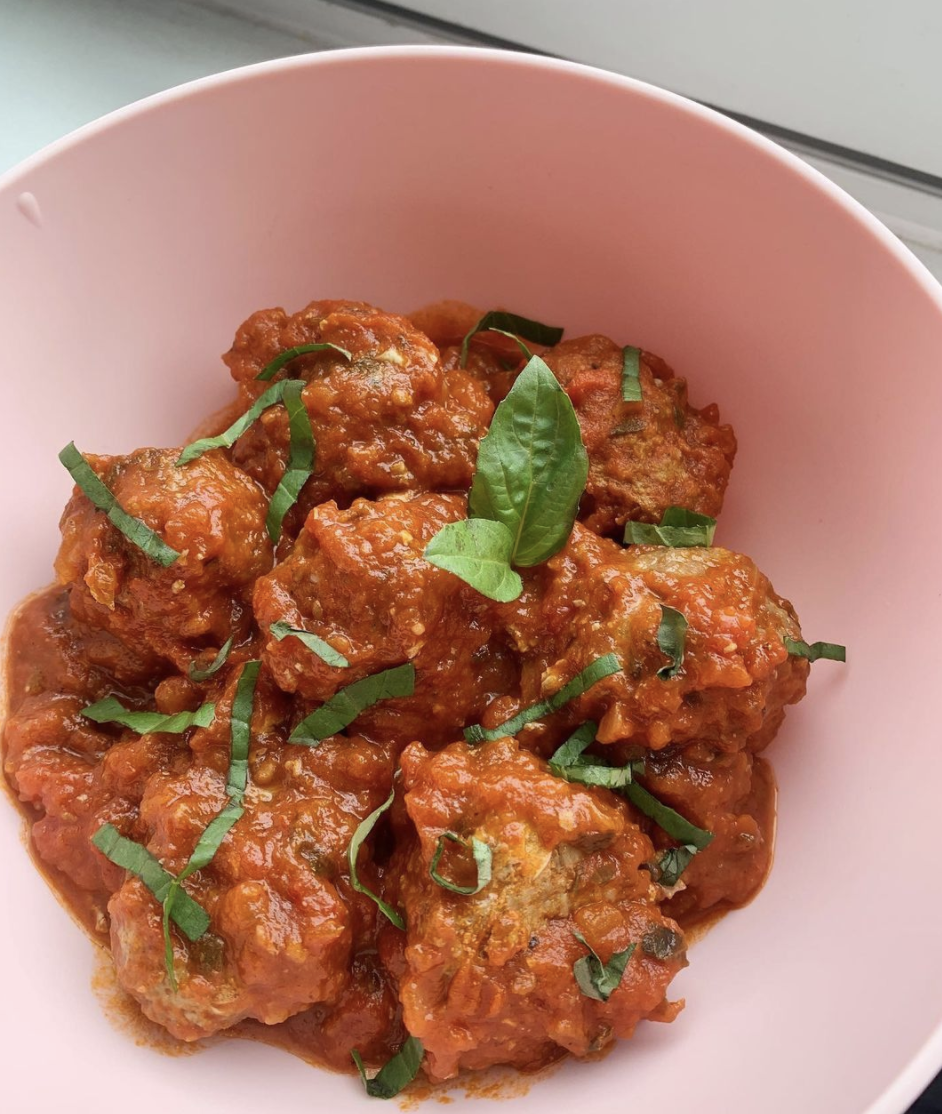
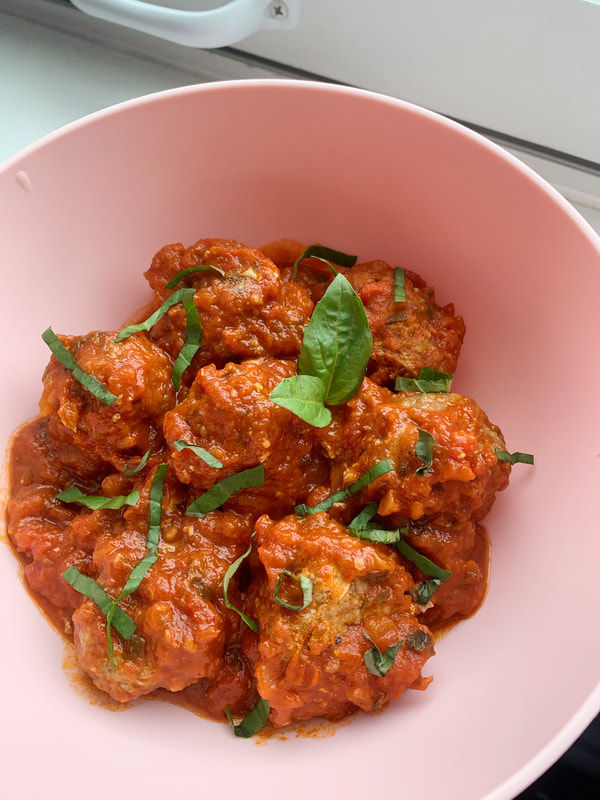
This simple sauce made from just 6 ingredients becomes a staple in my diet. I use it as a marinade, dressing and sauce on... everything! Below is my go-to pesto recipe 🤗🤍✨ Besto Pesto 🌿 Ingredients ✔️1/2 C Pine Nuts * ✔️3/4 C Parmesan Cheese, Grated ✔️4 Garlic Cloves, Minced ✔️6 Cups Basil Leaves (~ 3 bunches) ✔️3/4 C Extra Virgin Olive Oil (EVOO) ✔️1 Tsp. Salt Directions 1. Toast nuts and let cool. 2. Combine all ingredients in a food processor and pulse until well combined. 3. Enjoy! P. S. Pesto can be made ahead of time and stored in the refrigerator. Top with a thin layer of EVOO to prevent browning. *Don’t have pine nuts?! No problem! You can use walnuts, pumpkin seeds or hemp hearts instead. There is something about spaghetti & meatballs that screams comfort food. I’m not sure if I’m the only one who feels this way, but there really is something about a bowl of spaghetti & meatballs that brings me back to simpler times. My mama makes the most delicious homemade meatballs…like EVER.
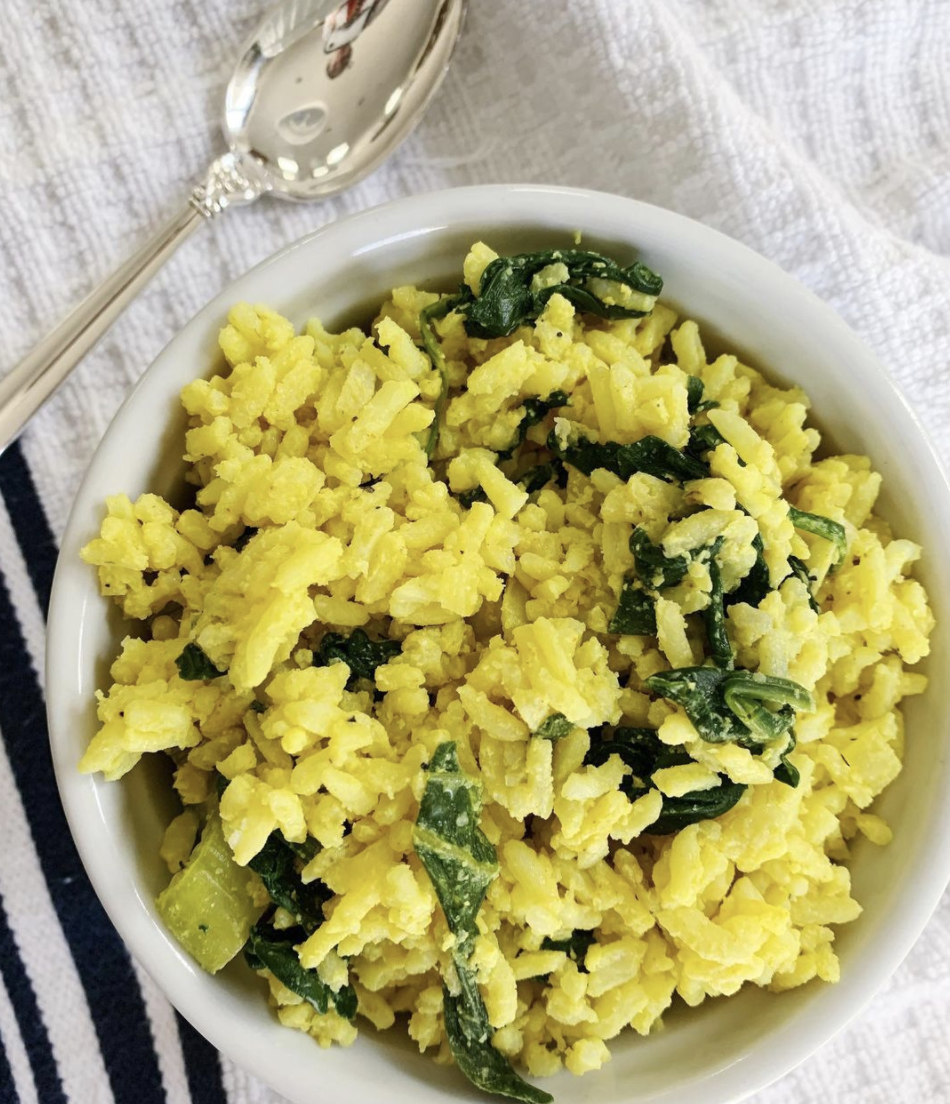
Knowing I simply don’t have the time to make my mama’s secret recipe I decided to take matters into my own hands. I present to you, the simplest and most delicious meatball recipe. Wether you’re whipping it up mid-week for a quick dinner, meal prepping or serving it at a Sunday night family dinner I’m sure it will bring back all the nostalgic feels 🥰 At least, I hope! LMK🤗🤍✨ ITALIAN MEATBALLS Yield: 12 meatballs 2-3 Servings Ingredients ✔️1 lb of ground protein (chicken, turkey, beef, pork or a combination) ✔️Salt ✔️Pepper ✔️Garlic Powder ✔️Italian Seasoning ✔️Diced Yellow Onion **optional ✔️Chopped Fresh Parsley **optional Directions 1. Preheat oven to 400 degrees F and line a baking sheet with parchment paper. 2. Combine meat, spices, onion and parsley. 3. Using a melon baller or 1 Tbsp measuring spoon, scoop the meat into approximately 1” balls. Place on parchment lined baking sheet. 4. Bake for 10 minutes, flip and bake for another 10-10 minutes. 5. Simmer the meatballs in the sauce of your choice, serve & ENJOY!! P.S. They’re #glutenfree and #eggfree CREAMY COCONUT TURMERIC RICE💛 This is a warm and cozy dish you won’t want to miss! It’s irresistibly delicious and the perfect addition to any meal, or make it you meal by loading it up with veggies and a runny egg 🤤
This is hands down one of my favorite recipes, aside from being easy to make, it’s scrumptious & LOADED with nutrients…can you say win, win?! 🤗🤍✨ Creamy Coconut Turmeric Rice Ingredients ✔️1 1/2 cups uncooked white jasmine rice ✔️2 1/4 cup low sodium vegetable broth (I prefer to add my own salt to taste) ✔️1 tbsp olive oil ✔️1/4 cup shallot, finely diced ✔️3 cloves of garlic, minced ✔️2 cups roughly chopped baby bok choy ~ 1 bunch ✔️2 cups baby spinach ✔️1 tsp ground turmeric ✔️1/2 tsp sea salt, more to taste ✔️1/4 tsp black pepper ✔️1 (14 oz) can full fat coconut milk (both watery and creamy parts) ✔️2–3 scallions, diced Directions 1. Start by cooking the rice according to the instructions on the box. Instead of using water, use the vegetable broth. Add a pinch of salt and 1 teaspoon of butter or ghee. 2. Prepare the other ingredients - chopping, dicing, etc. 3. Heat a large skillet with high sides over medium heat. 4. Pour in the olive oil, then slightly reduce heat and stir in the shallot and garlic and cook until fragrant, about 30 seconds. 5. Stir in the chopped bok choy, spinach, and all of the seasonings. Cook for 2 minutes, stirring occasionally. 6. Reduce heat and pour in coconut milk (use the entire can). Stir and allow to simmer with the vegetables for 5 minutes. Turn off heat, and stir in rice once it is done cooking. 7. Stir in scallions, serve and ENJOY!! For the original recipe click here Mediterranean Chicken Burgers 🌿 Aside from being absolutely delicious, these burgers are the definition of “prep once, eat twice” or three or four times 😂. They only take about 10 minutes to whip up and are packed with fiber & nutrients!
Don’t have these veggies in your refrigerator?! No problem!! Swap for whatever veggies you have on hand. Can’t eat them all at once?! No problem!! Wrap & freeze the extra burgers so they’ll be ready when you want them! I paired these with homemade french fries and salad with fresh feta & picked onions. What will you pair them with?! LMK in the comment below and ENJOY 👇🏼🤗🤍✨ Mediterranean Chicken Burgers 🌿 Ingredients ✔️1 lb ground chicken ✔️1/2 cup chopped spinach ⠀ ✔️1/2 bell pepper, diced ✔️1/4 cup roughly chopped fresh parsley⠀ ✔️1/4 heaping cup crumbled feta ⠀ ✔️2 tbsp red onion, finely diced ⠀ ✔️1/2 tsp sea salt⠀ ✔️1/2 tsp garlic powder ✔️1/2 tsp onion powder ✔️1/4 tsp black pepper ⠀⠀ ✔️1/4 of red pepper flakes Directions 1. Combine all ingredients together in a large bowl. 2. Form into 4-5 patties and preheat a large skillet over medium heat. 3. Once the pan is hot, add enough oil to generously cover the bottom on the skillet. 4. Cook the burgers for 5-7 minutes on each side, until browned and cooked through. 5. Serve & enjoy!! DIM SUM 🥬 GIMME SOME!
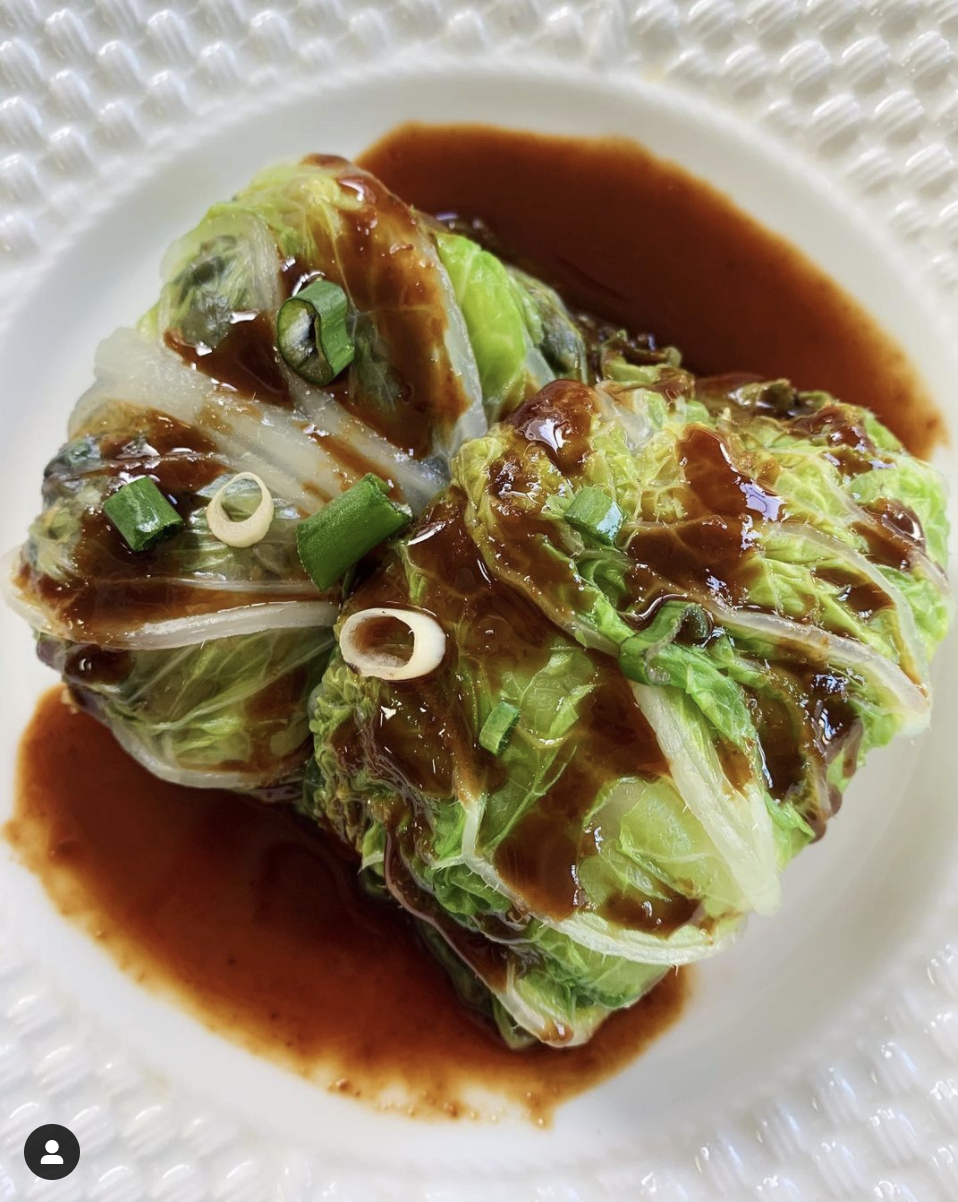
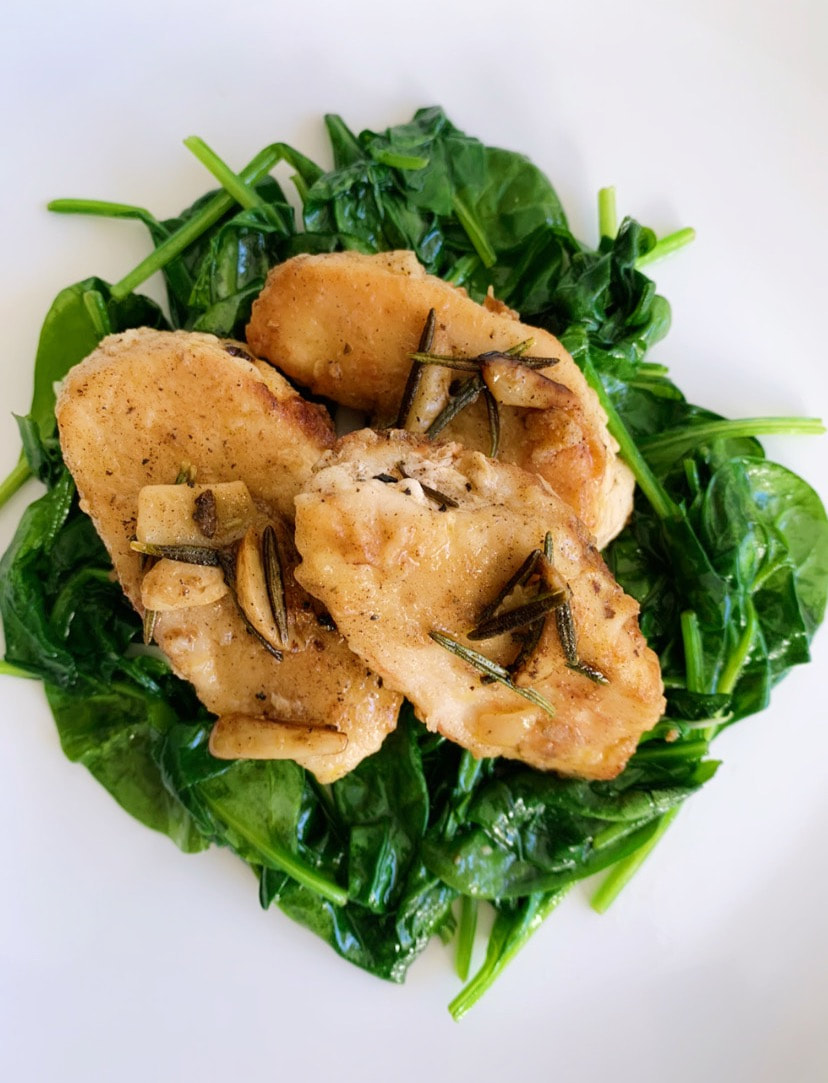
Say hello to your new go-to meal when you’re looking for an easy dinner that will BLOW AWAY friends & family. This 4 step recipe takes about 30 minutes to whip up and will look like you spent all day in the kitchen. With a variety of fillings that can be thrown together, it can easily be adapted to accommodate all diets & allergies 🤗🤍✨ Cabbage Dim Sum 🥬 Ingredients ✔️ 1 lb protein (ground chicken, turkey, pork, shrimp, tofu, mushrooms- or any veggies of choice, etc.) ✔️ 1 Bunch Scallions, minced ✔️ 1 Can Water Chestnuts, chopped ✔️ 5 Garlic Clove, minced ✔️ 2 Tbsp. Fresh Ginger, Minced ✔️ 1 1/2 Tsp. Salt ✔️ 1 Pinch of White Pepper ✔️ 1 Head Napa Cabbage ✔️ Tamari, Soy Sauce or Coconut Aminos Directions 1. Make Your Filling: Combine all ingredients except cabbage in a large bowl. 2. Blanche Cabbage Leaves: Fill a large pot with water and bring to a boil. Prepare an ice bath and pull cabbage leaves off the bunch (the bigger the better). Once the water has come to a boil put 3-4 leaves in the pot for 90 seconds and then quickly put into the ice bath. Continue until you have about 14 leaves blanched and patted dry. 3. Fill your leaves: Place one leaf flat on a cutting board with the end closest to you. Spoon about 2-3 tablespoons of filling into the center of the leaf. Fold the bottom away from you to cover the filling. Fold the sides in and continue rolling until you have a neat little package. Repeat until you have 10 dim sum. 4. Steam: Fill a pot with about 1 inch of water and set a steam basket inside. Cover the bottom of the steam basket with extra blanched cabbage leaves that ripped, etc. Place 5 dim sum in the basket and let steam for about 15 minutes or until the filling is slightly firm. Repeat with the 2nd batch, serve & enjoy!! Chicken Scarpariello (GF)
Ingredients
Directions
|